
It is fascinating to me that, with all the incredible electronic devices that we have in our lives, it is still possible to do an alignment job on a race car that has accuracy virtually equal to the most expensive alignment machines. All it takes is a good basic technique and care in executing the task.
This will give you a good starting point for doing your alignment using the StringStick™, the most accurate analog measuring device available for this purpose.

To start, you need some method of setting the strings along either side of the car. The strings have to be exactly parallel and should run approximately through the
center of the front and rear hub as far as vertical orientation. There are a number of devices available to mount strings on various cars, but you can also make your own quite easily. For my Lotus Elise, I took a couple of sections of aluminum angle one inch by one inch, clamped them together in a vice and drilled 1/16” holes on each and at various intervals. You need to drill though both pieces at the same time, so the holes will be exactly the same distance apart.
I then mounted one on the front of the car using the bracket for the front tow hook. On the rear, I used the license plate mounts. Regardless of how you are mounting the strings, you need the ability to adjust each mount laterally so that the car can be centered on the strings themselves.

The bracket on the WeatherTech Ferrari is a manufactured unit, and you can use it as a guide as far as function. TrakkRats will be offering our own system in the near future.
As far as the strings themselves, I like fluorescent mason’s string, as the edge is free from fuzz and highly visible. However, many prefer fluorescent monofilament fishing line and tend to center the line on the marks on the scale, as opposed to using the side of the mason’s string. With either, a fishing reel is a good way to store the string.

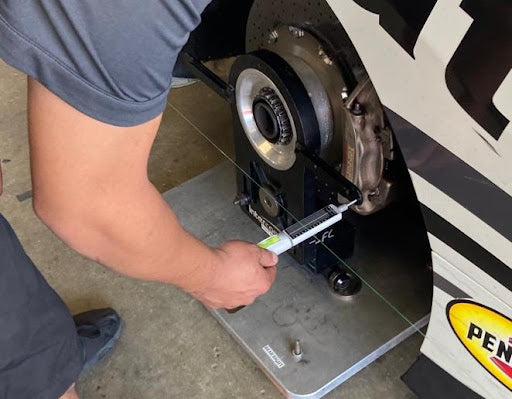
To center the car on the strings, you should take a measurement with your StringStick™ from the wheel hub to the string on each side and then very carefully move each bar from side to side until the distance from the hub to the string is identical on both sides. You will need to do this for both the front and the rear hubs.
You also need to be sure that the steering wheel is pointed straight ahead. You should then also secure the wheel in that position, as much as possible. In many cars, you may be able to take a couple of pairs of vice grips and clamp the steering column itself against some section underneath the dash. Anything that will keep the wheel level will work. You need to do this very carefully or after the alignment, you may find that the wheel is slightly turned one way or the other.

When you start to use the StringStick™, you may need to adjust the length of the threaded section to allow the string to fall in the lower portion of the scale, closest to the handle. It's best to work in that lower section, if possible, as you can see both the string and the leveling bubble at the same time.
If you twist the scale from the handle a bit, you will be able to thread out the probe as needed. When you get it at the distance you need, then tighten the handle back down. There are rubber O-rings to take up the slack, so it doesn’t have to be very tight. If you need more length than the included threaded section, it is a standard 10/24 thread and available in any hardware store.

When you are taking a reading, you want to be sure that the level is centered so you know the StringStick™ is flat and will be in the same position the next time you take a reading. You also want to be sure that this the string is parallel to the markings on the scale, itself. Then, you have the StringStick™ located both horizontally and vertically. This is essential for repeatable measurements. In general, you will find that the tip that resembles a large screwdriver works better with hub stands and the probe style works best against wheel rims.
The string can rest very gently on the scale but be careful the scale is not moving the string. If you are having issues with repeatability, please check runout on your rims. Sometimes remounting the wheel on a new location can help with runout.
At the end of this document, there is a Progression of Tasks. Many of the things that you will be doing in setting up your car interconnect and therefore setting one item may have influence on another. In this Progression of Tasks, you want to set caster first, then camber, and then the toe. You should read the Progression of Tasks in its entirety before starting on your string alignment.
Assuming that you have already set your caster and camber, then start at one of the wheels and check the toe. On the assumption that the steering wheel is straight, we will look at the left front wheel. Take a measurement on the rim or, if you are using hub stands, the end of the section that represents the rim. You will need to adjust the location of the strings so that the string will fall closer to the handle than the tip. This will allow you to see the location of the string and the bubble in the level at the same time.

The number that you see on the scale only relates to other numbers nearby, so you can use any portion of the scale. If, for example, the rear reading was 55.5 millimeters and the front reading was 54.5 millimeters then you would have 1 millimeter of toe out on that side of the car.
Then, you would need to take a measurement on the opposite side of the car and, as an example, we find that there is actually 1 millimeter of toe in on that side. Then, we would have a condition where the overall toe on the front of the car is zero. Then, when the car is driven straight ahead, the steering wheel would not be level.
So, let's assume that we want 2 millimeters of total toe out in the front. With our current readings, we can leave the left front as it is with one millimeter of toe out but we will need to get 2 millimeters of toe out added on the right side to keep a level steering wheel and have a net of two millimeters of toe out overall. This would mean that the readings that we are getting when finished on the right side would be something like a 55.5 in the rear and 54.5 in the front. Sometimes, it helps to visualize an exaggerated movement of the wheel to reconfirm you are moving the right way.
Then, moving to the rear, we take a reading on the left side and find that we have a reading of 46 on the rear and 47.5 in the front. That would mean that the rear has about 1.5 millimeters of toe in on the left side. Moving to the right side we find that we have a reading of 44 on the rear and 47 on the front. That would give us toe in of 3 millimeters on the right rear. The WeatherTech Ferrari normally runs closer to 2 millimeters on each side. So, both sides would need to be adjusted until they are showing 2 millimeters of toe equally.
So, in this example, the car ends up with a total of 2 millimeters of toe out in the front and a total of 4 millimeters of total, in at the rear. In the front, a street car normally has toe in for directional stability, but a race car often has toe out, as this helps on corner entry. In some cars, it is helpful to run a slight amount of toe out or toe in, perhaps 1/2 millimeter each side, just to keep tire temperatures up.
In the rear, it is common to run a certain amount of toe in for stability. The less toe in, the quicker the car will be to rotate, but also a bit less stable. Therefore, this will depend on driver preference. 
So, there you are. Your first string alignment of your racecar with your StringStick™